9. Typing Coach User Manager in Details
This chapter will cover the features and use of Typing Coach User Manager.
Typing Coach User Manager is a powerful tool for course administrators. It can store personal study data of users
recognizing any user on any workstation within the network. With the advanced
Manager you can manage users as groups and follow their progress and
test scores with a variety of reports that can be created very easily
in just a matter of seconds. You can also arrange fully customized typing
tests for individuals or one or more groups using texts of your own choice.
Typing Coach User Manager gives the course administrator control over the way
in which the lessons progress. You can, for example, select the courses
to be studied, disable skipping lessons and lock lessons so that they
must be completed before the user can move on.
9.1 Main Features
This chapter will introduce you to the main features of Typing Coach User
Manager. You will be shown how to create and edit users, organize
them into groups and print reports of their progress. The main features
of setting typing tests and organizing your licenses are also explained.
Typing Coach User Manager is divided into six main sections: Users,
Groups, Courses, Typing Tests, Licenses and Common Settings. Each of these
sections can be reached by selecting the appropriate tab. The controls
for each section are situated in the menu at the left side of the screen.
DATA SYNC FEATURE:
Each student device maintains a small local data folder. All transfers occur automatically when the program starts or closes. No continuous background syncing is performed.
The Teacher Manager Tool shows the student data and global settings locally in teacher's device.
Teacher much use SYNC buttons to collect results from the cloud and publish updated configurations back to students.
Sync From Students: This button should be clicked whenever the teacher wishes to receive the most recent information from their students. It is recommended to click this button at least once daily to stay updated with daily data.
Sync To Students:
In the event that the teacher makes any changes in the User Manager, it is imperative to click the "Sync to Students" button. Failure to do so will result in the new settings not being sent to the students.
NOTE: After modifying user, group or common settings
the users usually need to login again so that the new settings can
take effect.
Also some settings require that the user must select the option after
the change has been made. For example changing the time allocated for
a test, exercise or course will only take effect if the user selects the
option after the new time has been set.
9.1.1 Users
When you select the 'Users' tab in Typing Coach User Manager, you will see
the users of Typing Coach in an alphabetical list with general information
on each user. By default, all users are shown in the list. To view users
in a specific group, select the group name from the drop-down list in the
user menu. You can also choose to sort user list differently by clicking
the corresponding column name.
The list of users shows the following information for each user:
- User name
- The group that this user belongs to. The default group for users
is 'New Users'.
- The name of the course the user is currently studying
- Percentage completed of the current course
- The date and time Typing Coach was last used
- The number of times Typing Coach has been used
- The date the user was created
- Amount of completed Typing Tests
User Menu
The user menu offers many powerful tools for creating new users and editing
the settings of old users.
All the options connected to a specific user are gathered under this
menu. To modify the properties of a user, select the user from the list
of users and then choose the action you wish to modify from the User Menu.
Here is a description of all the options in the user menu with tips for
their use.
Choose Group
You can choose the group of users to be listed with this drop-down
menu. This helps manage users especially if the userbase is very large.
View & Print Reports
These options let the administrator view and print a variety of reports on the progress
of users.
| Complete Report |
This option creates a complete report on the selected
user. The report first displays general information on the user
including group name, current course, complete studying time, date
of creation and date and time of last usage.
This is followed by a detailed summary of all the exercises and
tests the user has completed. The type, duration, date and time
are shown for each exercise and test. The results of the exercise
are also shown where applicable. Click 'close' when you want to
return to 'Users' screen. You can also choose the width of the page
from the drop-down menu.
NOTE: If the exercise name is in brackets, e.g. (1.7) this means that the exercise was not completed in full. The column "Time" shows the time the user has spent on the exercise whilst column "Duration" shows the exercise duration. |
| Latest Exercises |
This option shows the latest completed exercises of
the selected user. The report shows a detailed summary of the exercise
along with information on the results of the exercise where applicable. |
| User List |
This option creates a report on the selected users.
The users are grouped by their studying group and general studying
information is displayed for each user.
To select all users in the user list click on the menu option
'Select All' under Edit User(s) or press CTRL-A while in the user
list. Individual users can be added to a selection by clicking
on a user name with the CTRL key pressed.
|
| Typing Test Details |
This option shows the detailed report of the last completed test of
the selected user(s). The report shows also the actual test text
typed by user with each typing mistake marked clearly to the text.
Tip! If you need to see the details of an earlier test, you can open
the report from the typing tutor's Typing Test section when the user
is logged in. |
| Latest Tests |
This option shows the latest tests of the selected user.
The report shows test name, user's gross and net speed and accuracy, total keystrokes and number errors. |
| Typing Test Certificate |
This option shows the typing test certificate of last completed
test of the selected user(s). |
User Tasks
These options let the administrator perform actions that affect the selected
user. These are only available if DUAL MODE SYNC is enabled from Common Settings. Also SYNC TO STUDENTS button needs to be clicked after making any changes.
| Change settings |
Selecting this option brings up a window that shows
the selected user's settings.
You can view and change these settings and also enter
a new password for the user if the current password has been
forgotten or if the user name has just been created.
The other user settings are the same that can be defined in the
Common Settings section. However, these settings apply only to the
selected user. For detailed information on these settings please
see the Common Settings chapter of the manual (4.2).
NOTE: The user settings that have been locked in the Common
Settings menu override these user settings.
|
| Set Group |
This option brings up a window where you can select
an existing group or create a new one for the selected user.
TIP! It is practical to set a class of users as a group.
This way you can control the settings and arrange a typing test
for a whole class just by modifying group properties.
|
| Send Message |
With this option you can send a message to a
selected user. The user receives the message when he/she starts
Typing Coach.
NOTE:
A new message sent to a user will override an older unread message.
|
| Arrange Typing Test |
With this option you can arrange a typing test
for the selected user. You will be able to select the test
text, test duration, and enter a message for the user.
When the user starts Typing Coach, the user will be taken to the test automatically.
|
Edit User(s)
These options let the administrator edit users in the user list. Options are only available if DUAL MODE SYNC is enabled.
| Rename User |
You can rename the selected user.
|
| Delete User |
With this option you can delete the selected
user. It is important to click SYNC TO STUDENTS button after deleting users, otherwise the users may appear back from workstations in next Data Sync.
NOTE: DUAL MODE SYNC setting needs to be enabled to delete user also from workstations |
| Add User |
This option will add a user to the user list and
let you type the name of the user. The user is assigned to group
'New Users' by default. You can change the group by selecting the
user and clicking on 'Set Group'. |
| Select All |
This option will select all users in the user list.
After selecting all users, you can make desired changes and all users
will be affected. |
9.1.2 Groups
When you select the 'Groups' tab in Typing Coach User Manager, you will see
all the groups you have created, the amount of users in a group and
the date the group was created.
Group Menu
The 'Groups' menu offers many powerful tools for creating and editing
groups.
All the options connected to a group are gathered under this menu. To
modify the settings of a group, select a group from the list of groups
and then choose the setting you wish to modify from the Groups menu.
Here is a description of all the options in the Groups menu with tips
for their use.
View & Print Reports
These options will enable the administrator to print out a variety of reports
for the selected group
| Complete Report |
This option creates complete reports for all users
in the selected group. You can browse the reports with 'Prev. Page'
and 'Next Page' buttons and return to 'Groups' menu by clicking on
'Close'.
NOTE: If the exercise name is in brackets, e.g. (1.7) this means that the exercise was not completed in full. The column "Time" shows the time the user has spent on the exercise whilst column "Duration" shows the exercise duration. |
| Latest Exercises |
This option creates detailed information on each user's
latest exercises. |
| Latest Tests |
This option creates a report with detailed information
on each user's latest typing tests. |
| User List |
This option creates a list of all the users in the selected
group. The list includes the user name and a short summary on the
status of the user. |
| Summary Report |
Summary report contains figures about progress of chosen group.
The course list displays how many users have started or completed
each course. Some averages are counted for the group, such as time
spent in all courses and the average course completion progress. |
| Typing Test Details |
This option shows the detailed report of last completed test of
the selected group. The report shows also the actual test text typed
by user with each typing mistake marked clearly to the text.
Tip! If you need to see the details of an earlier test, you can open the
report from the typing tutor's Typing Test section when the user
is logged in. |
| Typing Test Certificate |
This option shows the typing test certificate of last completed
test of the selected group. |
Group Tasks
These options let the administrator perform actions that affect all users
in the selected group.
| Change Settings |
With this option, you are able to set and
lock settings that affect all users in the selected group. For
detailed information on each setting, go to the Common
Settings chapter of the manual (4.2).
NOTE: The settings selected and locked
in Common Settings override the group settings. Generally it is
a good idea to leave the lesson options blank in the Common Settings
and set them individually for each group.
|
| Send Message |
With this setting, you can send a message to
all users in the selected group. The users will receive the
message when they start Typing Coach.
NOTE: A new message sent to a group will
override an older unread message.
|
| Arrange Typing Test |
With this option it is possible to arrange a typing
test to all users in the selected group. You can choose the test
text, test duration and write a message that will be sent to the users (optional).
When a user in a group starts Typing Coach he/she will be taken
to the typing test automatically. |
Edit Group
These options let the administrator edit groups.
| Rename Group |
Selecting this option will let you edit the group name.
Pressing Enter will commit the new name; pressing Esc will cancel
the new name. If you want, you can also change the name of the default group 'New
Users'. |
| Delete Group |
Selecting this option will delete the chosen group.
The program will also ask if all users in the group should be deleted.
If you click on 'Yes', all users belonging to the group are deleted. If you click on 'No' the users from the deleted group are set to the default group. |
| Add Group |
This option will add a new group to the list and let
you set the name for the group. |
9.1.3 Courses
When you select the 'Courses' tab in Typing Coach User Manager, you will see
all the courses that have been installed in Typing Coach. The list
shows the Name and Description of a particular course. The column 'Lessons'
shows the amount of lessons and the lesson duration chosen for a course.
Course Tasks Menu
From the Course Tasks menu the administrator can change the settings, show/hide and
mark the selected course as default.
Here is a description of all the options in the Course Tasks menu with
tips for their use.
NOTE: Course settings are the same for all users and groups.
Course Tasks
| Change Settings |
This option lets tyou change the lesson settings
such as default time for the lesson. When the time is locked users
will not be able to change it in the program. |
| Enable / Disable Course |
This option will let you show or hide the chosen course
from users. You may want to hide courses that are not part of your
course plan. |
| Make default |
Only one course at a time can be the default one. Choose the course
that each user should complete first. If you want that only one particular
course is accessible you can disable all other courses with Disable
Course button. |
Course Settings
| Lesson Duration |
With this setting you are able to set the default time
for a lesson. You can lock the duration and users cannot change it
themselves. |
| Lesson Lock |
Enabling this setting locks the access to next lessons
unless user has completed each exercise in the current lesson.
Tip: You can set Bypass lesson lock setting for individual
groups or users if necessary. |
| Exercise Lock |
This setting is designed to make sure that each user
will spend the full time in exercises and cannot skip them before
exercises are fully completed. |
Lesson Exam Settings
(available only in "Teacher led training" lesson mode)
| Minimum Net Speed |
Each lesson contains an exam as the last exercise. Set
here the minimum net speed needed to pass this exam. Only if this
limit is reached does the exam appear as completed and user can go
to next lesson. Net Speed is the typing speed calculated after error
penalties have been calculated. |
| Minimum Accuracy |
Sets the accuracy level needed to pass the exam. Accuracy
percentage of words typed correctly, 100% means that all words were
type, 50% means that only half of all words were typed correctly.
Only if this limit is reached the exam is marked as completed. |
| Exam Lock |
When this option is checked, an Lesson Exam will be
marked completed only if the users types the whole text or the
whole time required. |
| Exam Time |
You can choose to override the course specific exam durations that may
differ between lessons. Use this option if the exams appear to be
too long. |
9.1.4 Typing Tests
When you select the 'Typing Tests' tab in Typing Coach User Manager, you will
see all the typing tests that have been installed in Typing Coach.
The list shows the Name and Copyright of a particular text. The column
'Time (min.)' shows the default time selected for a particular text. The
text (Lock) at the end of the time indicates that the default time has
been locked.
Typing Test Menu
From the Typing Test menu the administrator can change the settings, edit and delete
the selected text.
Here is a description of all the options in the Typing Test menu with
tips for their use.
Test Tasks
| Change Settings |
This option lets you change the name and default
time for the selected text. When the time is locked users will
not be able to change it in the program. Note that the arranged
typing tests (see 4.1.2.) override the default time even if it is
locked. |
| Edit Text |
This option will let you edit the selected test. |
Edit Test
| Hide/Show Test |
Hides the test from the users. This means it can not be selected
from the Test Selection menu when a user takes a test. You can see
easily which tests texts are hidden in the Typing Test tab as they have a red line over the document icon.
This setting is designed so that you are able
to hide any tests you may wish to use to grade the users with.
You can then unhide and assign the test at the desired time. |
| Delete Test |
This option will permanently delete the selected Typing
Test. |
| Add Test |
Selecting this option will bring up a window where you
can choose a text file to be added as a typing test.
IMPORTANT: The file that is added has to be
a standard ASCII text file without any formatting information. We strongly recommend doing any text additions with Notepad or similar text editor. If
you need to use a text created with a word processor, we recommend to first copy-paste it to Notepad and save it as a .TXT file before adding the text the tests. |
Typing Test Settings
| Name |
Allows you to edit the name of the test; this is the
name that is displayed both in the Manager and to users in the tutor. |
| Default Time |
With this setting you are able to set the time for a
test. Set the test duration in minutes by entering a number between
0-99. 0 means there is no time limit for the test.
Please only enter
whole numbers, decimals and fractions will not be recognized. |
| Test Time Lock |
Enabling this locks the test time to the value specified
in the Default Time setting. Without locking the time users can change
the time from its default setting before beginning the test. |
Requirements to Pass the Test
| Minimum Net Speed |
Sets the minimum net speed needed to pass the test.
Only if this limit is reached does the test appear in the users report.
Net Speed is the typing speed after error penalties have
been calculated.
|
| Minimum Gross Speed |
Sets the minimum gross speed needed to pass the test.
Only if this limit is reach does the test appear in the users report.
Gross Speed is the user's typing speed throughout the test, no penalties
are considered. |
| Minimum Accuracy |
Sets the accuracy percentage needed to pass the test. Only if this limit is reached does the test appear in the users report. Accuracy percentage is the ratio of keystrokes after error penalties to all keys typed. |
| Force Completion |
Enabling this means that the user must type for the
whole duration of the test for it to be passed. So if the test has
been locked to 2 minutes, the user must type for that entire time
to ensure they pass the test. If the user types through the entire
test text before the time has completed they also meet this requirement. |
IMPORTANT: You should not use Minimum Net Speed and Minimum Gross Speed at the same time as these settings can conflict with each other.
NOTE: If passing limits are set for both speed and accuracy then the
user must meet them both to pass the test.
9.1.5 Licenses
When you select the 'Licenses' tab in Typing Coach Manager, you will
see all the workstation in network that have accessed Typing Coach.
The list shows the following information for all licenses:
- Workstation name
- Installation date
- Number of times the program has been used
- Date when program was last used and user name
- The user name of the person who installed the workstation license.
The information bar at the lower left corner of the window displays the
number of licenses in use and the number of free licenses.
Concurrent Licenses: By clicking the workstation, you can see
if it currently reserves an concurrent license.
Licenses Menu
The Licenses Menu shows the type of licenses inserted (workstation or
concurrent), the total number of licenses, licenses used and the number
of free licenses. In the licenses menu, the following options are available:
| View/Add Licenses |
When you select this option, a window appears showing
you the licenses you have in use.
You can insert new license packages into Typing Coach by inserting
the License ID and Product Key in the appropriate fields.
|
| Remove Workstation |
You can remove workstations to free up workstation licenses.
NOTE: Removing of workstations does not remove the workstation from DATA SYNC FOLDER.
When you click SYNC FROM STUDENTS, the workstation will re-appear automatically unless the DATA SYNC folder has been manually wiped or changed.
After you have uninstalled Typing Coach from the workstations,
you need to manually clean DATA SYNC folder before clicking 'Licenses
> Remove Workstation'.
|
| Select All |
Use this option to select all workstations easily . |
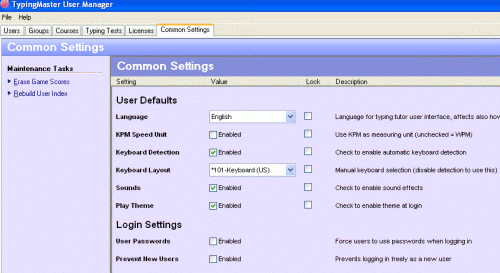
9.2 Common Settings
The first time you use Typing Coach User Manager will probably be after your
server installation if you want to change the installation
directory. However, you can control many more settings and options in
Common Settings, which shall be explained in this chapter in detail.
Common
Settings affect all workstation installations and users.
To access the 'Common Settings' start Typing Coach User Manager and select the
tab 'Common Settings'.
NOTE: Pressing 'Cancel' instead of 'Save' undos the changes just made.
NOTE: The settings selected and locked in the Common Settings override the group settings (see 9.1.2).
Below is a list of all the settings and some information pertaining to
their use.
User Default Settings
With these settings, the administrator is able to enforce a common policy for
all users.
NOTE: The default settings can be also locked in
order to force all users to have them in use.
| Language |
The typing tutor user interface default language can
be defined or locked. The choices are based on add-on languages that
were installed with the Setup. If you need additional language later
on, you can start Setup again to install additional language(s). |
| KPM Speed Unit |
With this option the administrator can select
the default unit for speed measurement. When the option is unselected
the default is WPM (Words per Minute) otherwise it is KPM (Keystrokes
per Minute) also known as CPM (Characters per Minute). When this value is locked, the speed
unit cannot be changed by the user. |
| Sounds |
Select this option to enable sounds in Typing Coach
Pro. Sound is not essential for the operation of the program, but
it gives additional feedback to the user. |
| Play Theme |
Select this option to enable the opening theme of Typing Coach
Pro. |
| Keyboard Detection |
When this option is selected and locked, the program
will automatically detect the correct keyboard layout for each workstation
installation.
This option is recommended if your network has computers with different
keyboard layouts in use and the automatic detection is functioning
reliably.
|
| Keyboard Layout |
With this option, the administrator can manually select
a keyboard layout to be used for all workstation installations of
Typing Coach.
This option is recommended if all computers in your network use
the same keyboard layout.
NOTE: Keyboard Detection has to be de-selected
in order for the manual keyboard selection to function.
|
Login Settings
Scroll down the screen to see Login Settings with which the administrator
is able to define user login properties.
| User Passwords |
If this option is selected all users are required to
create a password for themselves when logging in for the first time.
The password is required each time the user logs in.
NOTE: If users are created by
an administrator and this option is selected, the administrator
has to define a password for the user when creating the user. If
a password is not defined, the user will not be able to log in.
|
| Prevent New Users |
By selecting this option, you can disable
the creation of new users in Typing Coach. With this option selected,
the only way of creating new users is with the Manager. |
| Prevent Self Grouping |
By default each new user can pick a group where they belong to during
the first logon. You can prevent this behavior with this option. |
| Hide User List |
You can select this option to hide the
list of users in the login screen. This results in added security
when each user has to know his/her user name to be able to log in. |
| Hide Group List |
With this option, the group menu in the login screen
is also suppressed. |
| Use Windows Login |
When this option is selected Typing Coach will automatically
log in with the user's Windows user name.
This is recommended in environments where each user has a distinct
Windows user name. With this option selected the same user name
will also be used for Typing Coach.
|
Typing Test Settings
These settings let the administrator restrict user privileges in the
typing test section of Typing Coach.
| Prevent Test Deletion |
When this option is selected, users will not be able
to delete tests in the program. This will then be possible only through
the Manager. |
| Prevent New Test |
With this option you can prevent users
adding custom test texts to the program. With this option selected,
adding test texts is possible only through the Manager. |
| Disable Printing |
You can prevent users from printing reports
or test diplomas from their workstations. Printing will then be possible
only through the Manager. |
Settings
Advanced Settings
| Prevent Backspace |
This option lets you disable the use of
backspace in exercises and tests for all users.
Normally a user is able to make corrections on the word currently
being typed. With this option selected the user cannot make any
corrections.
|
| WPM Word Length |
With this setting it is possible to change how the standard
WPM is counted (this affects also the error hits counting).
The default
value for this setting is 5 (i.e. using 5-keystroke standard word). If you wish to use Business Language
WPM setting, the value would be 6. For some European languages, value
would be 10. |
| Disable Internet Links |
This setting prevents users from accessing the Internet
links on the Info page. By default clicking on these links opens a
browser displaying offline information about Typing Coach. |
| Enable Rhythm Indicator |
Activating this displays the Rhythm Indicator. The Rhythm
Indicator shows the user how smoothly they type, with emphasis on
trying to motivate them to type at an even pace rather than is spurts.
The indicator is displayed in the right hand side of the screen during
exercises only. |
| Disable Games from Menu |
Hides the games menu from users. Games can still be
played if they are embedded as an exercise in a Lesson but the option is removed
from the menu so they can no longer be selected independently. |
| Disable PDF |
Prevents users from exporting their progress reports to PDF data
format. |
| Disable Full Screen |
Prevents users from enabling the Zoom Full Screen mode that requires
DirectX. The Zoom mode changes the display resolution to fixed 800x600.
|
9.3 Special Features
Typing Coach User Manager offers these special features which give more power
to the administrator.
9.3.1 Real Time User Monitoring with Traditional Network Installation
Typing Coach supports real time monitoring of users. The administrator
is able to monitor the users' progress while they are studying on their
workstations. When the user is studying (or the Satellite is active),
a lock will appear on top of the user icon in the user list.
When a user is locked, the administrator will not be able to change user
properties or delete the user. The administrator can view a user's progress
by selecting a report to be viewed. All exercises and tests that the user
has completed will be displayed in the reports.
NOTE: The user list in the Users section of the
Manager is updated only when Manager is started or Refresh button is clicked.
Therefore, summary information displayed in the user list may not be up
to date all the time when users are studying.
To view a user's current status, create a report on the user.
This will display up-to-date information on the user.
9.3.2 Importing and Exporting users from/to CSV file
You can create new users for Typing Coach User Manager from an existing
list. Information such as name, group and password can be taken from any
.csv file (i.e. comma separated user list file), usually an Excel or database
file. It is possible also to export names and general status of users
to Comma Separated File (CSV).
To import users, start Typing Coach user Manager and select File > Import Users.
This will bring up a new window.
Import only accepts CSV files so you need have saved the source file
in CSV format in advance. To convert an Excel file to a CSV file, save the file again choosing 'File > Save As' and selecting 'CSV (comma delimited)' from the
'Save as Type' drop-down menu. Note that you should delete all heading
and title information such as First name, Last name, Class etc., from
the source file before importing information to Typing Coach. Otherwise
you will have users like "Last name, First name" in the Typing Coach
User Manager and need to remove those afterwards.
Once the Import screen is open, the screen is divided in two. The top half,
or section 1, is dedicated to choosing the source file from which you
want to import user information. Click on 'Open Data Source', browse and
select the file you want to import and click on 'Open'. Typing Coach Import tool now
shows the contents of the file you chose on the top-right-hand side of
the screen as well as in the preview window below it. If you have chosen
a wrong file, you can easily change your selection by clicking on 'Open
Data Source' and choosing a different file.
The bottom half of the screen, or Section 2, is dedicated to modifying
column information and completing the process. First have a look at the
Preview window on the right and check that column headings are correct.
The default column headings in the preview window are 'First name', 'Last
name', 'Class/Group' and 'Password'. If your source file has listed data
in a different order or has more columns, you can now change the column
headings accordingly. To change column headings, use the drop-down menus
on the left-hand side. They are numbered from 1 to 6 referring to the
respective columns in the Preview window and show the heading options
from which you can choose. Select the ones that match your table and use
'n/a' if you do not want to import the information from some column(s).
Below the drop-down menus there is a box 'Create the Group/Class if missing',
which is checked by default. When checked, the User Manager creates new
groups by using the group names you have in the .csv file and places imported
users automatically under these groups. If some users do not have group
information, the User Manager places them under the default group set
in the User Manager (usually 'New Users'). If you uncheck the box, the software tries to assign
users to existing groups, but does not create new groups. For example,
if in the source file you have some group names and in the User Manager
groups with the same name, the software take the users from those groups
and place in the matching group in the User Manager. All others users
from your .csv file will be entered into the default group in the User
Manager. You can then group the imported users manually afterwards with
the Manager. Admittedly, the tool is a bit confusing if you uncheck the
'Create the Group/Class if missing'. We'll work on it to make it clearer.
Once everything is set to your satisfaction, click on 'Import Now'. The
tool will now enter user information from the .csv file to Typing Coach
User List.
Supported CSV Data Formats
This utility supports two most common industrial CSV formats, semicolon
and comma separated ones.
1. Semicolon format (without quotes)
Example data:
user name;group;something;something
2. Comma separated list with quotes
Example data:
"user name","school group","anything","something"
The very first line of CSV file is used to detect if semicolon or comma
should be used as a separator mark.
For example all the following data formats could be used:
"john smith","class 1","mypassword","+1
322 1239"
"john","smith","class 1","+1 322 1239","mypassword","teacher
name"
"smith","john","+1 322 1239","mypassword","teacher
name","class 1"
john;smith
john smith;group one
Note: If the new users are not shown on client computers, go to the Common Settings page and click on "Rebuild User Index" link on the left to fix the problem.
9.3.3 Multiple Typing Coach Installations (Traditional Network Installation)
It is possible to use the same Typing Coach User Manager on the administrator's
computer to control multiple versions of Typing Coach. This is helpful
if you have Typing Coach installed on more than one server.
To control the database of a different installation of Typing Coach you
will have to perform the following procedure:
- Start Typing Coach Manager
- Select File > Change Directory
- The current installation directory of Typing Coach is shown. To
edit the database of another Typing Coach installation, enter the
complete path of the new directory in the space provided.
- If you do not know the complete path, you can select 'Browse' and
choose the installation directory from the directory tree.
9.3.4 Maintenance Tasks
From the Common Settings tab, administrator can complete some maintenance
tasks.
Resetting scores in games
In school use, it is good to reset the top ten high scores from time to
time. You can do this very easily by clicking Erase Game scores button.
Rebuilding Corrupted User Index
If the user list of Typing Coach user login page does not display the all names
shown in the Manager for some reason, click the Rebuild User Index button.
No data is lost, but the group index files ( .IDX) are created again to solve the problem.


