How to use Typing Master 11
-
Installation and User Manual
Version 11.0; Copyright Cloud Kayak Labs, Inc. 2025
Contents
| 1. Introduction | 5 Program Features | |
| 5.1 Review | ||
| 2. Installation | 5.1.1 Review Options | |
| 2.1 Downloading | 5.2 Typing Test | |
| 2.2 Logging In | 5.2.1 Typing Test Options | |
| 5.2.2 The Test | ||
| 3. Starting TypingMaster 11 | ||
| 3.1 Launching | 6. Games | |
| 3.2 First time launching | ||
| 3.3 Logging in | 7. Statistics | |
| 3.4 Exiting | ||
| 8. Settings | ||
| 4. Using TypingMaster | 9. TypingMeter | |
| 4.1 Getting Started | 9.1 Introduction | |
| 4.2 Studying Concepts | 9.2 Setting up the TypingMeter | |
| 4.2.1 Courses | 9.3 TypingMaster TypingMeter | |
| 4.2.2 Lessons | 9.4 TypingMeter Menu | |
| 4.2.3 Exercises | 9.5 TypingMeter Settings | |
| 4.3 Optimized Duration | 9.6 Training | |
| 4.3.1 How it works | 9.7 Analysis | |
| 4.3.2 Turn Off Optimized Duration | 9.8 Statistics | |
| 10. Entering Licenses | ||
| 11. Lesson Study Material Editor |
1. Introduction
Welcome to TypingMaster 11. This powerful typing tutor will help you improve your typing substantially whether you are a novice or a seasoned professional. TypingMaster has many courses that will satisfy your changing needs as your skills and speed improve.
The complete touch typing course will teach you the touch typing technique starting with the basics and advancing step-by-step using examples, word drills and games to get you familiar with your keyboard.
TypingMaster 11 also offers a Speed Building course to help you hone your typing skills once you have the basics covered. This is also good for experienced typists looking to keep their skill level up. Courses to practice the numbers, special character keys and the numeric keypad are also included.
Also included is the dynamic Review section and the unique Widget called TypingMeter, which monitors your typing progress while you are using other programs such as email and word processor. These tools monitor your typing and create customized training to suit your individual needs. Due to the advanced typing analysis of these tools they will help improve your typing long after you have finished with the courses.
This manual will help you get TypingMaster 11 installed and running on your system. All of the features in TypingMaster 11 and the TypingMeter are also explained. Please read this manual carefully before installing TypingMaster 11 on your computer. This will ensure a trouble free installation and an easy startup. You will also know how to take advantage of all the features TypingMaster 11 has to offer.
2. Installation
TypingMaster 11 is available for Windows computers only.
This section will explain the necessary steps to download TypingMaster 11 and get it installed on your computer.
2.1 Downloading
Please download the latest version of TypingMaster 11 from this address: https://www.typingmaster.com/typing-tutor/. Click on this address to start downloading.
If you get a popup window asking you whether you wish to save the program to disk or run it from the current location, select RUN and click on 'OK'. Usually setup package will be saved into DOWNLOADS folder. You need to click TypingMaster file from that folder to start the installation.
When you select 'Download' the download will begin. The size of the installation package is around 11 MB. If you are using a modem, please reserve adequate time for the download process. The estimated download time is around 1 minutes.
2.2 TypingMaster Setup / Installer Program
The installer will first ask you a few questions on where you wish to install TypingMaster 11 and the type of installation. After this, the program will copy all necessary files to your installation folder and creates icons to the Start -menu. In this section we will go through the different choices you will have that affect the installation of TypingMaster.
-
The install program will start by asking you to close all running programs. If you do not have any other programs running select 'Next' to continue. Otherwise, select 'Cancel' and close all other programs and restart the setup program.
-
You will be presented with the License Agreement. Please read through this agreement carefully before accepting its terms. By selecting 'I accept the agreement' you indicate that you have read the agreement and accepted its terms and the installation will continue. If you select 'I do not accept the agreement' the setup program will abort.
-
Now you can specify the folder where TypingMaster will be installed. If you are satisfied with a folder select 'Next'. If you are unsure of where to install TypingMaster select 'Next' since the default folder works best with most computer setups.
-
Now you will be asked which type of setup you wish to install on your computer. The choices you make here affect what components will be installed to your computer. The following table will describe each of the setup options and the components that will be installed with each option. Please select the option that is the most appropriate for you and click on 'Next'.
NOTE:You can select the parts you wish to install. For example you may not want to use the TypingMeter so you could uncheck it, or you may want to try the Study Material Editor to edit the course material.
-
After selecting the type of setup, you can choose the location where TypingMaster 11 program icons will be placed in the Start -menu. The default folder is TypingMaster. If you are satisfied with this, select 'Next' and the setup program will create a TypingMaster folder under Programs in the Start -menu.
If you wish to have the program icons in another folder, you can select an existing folder from the list or type in a name of your own in the 'Program Folders' field. When you have made your selection, select 'Next'. -
Now, you will be presented with the choices you have made. If you are satisfied with these choices select 'Next'.
If you wish to change some of your choices, you can return to your previous selections by selecting 'Back' until you reach the desired screen. -
The install program will now copy the program files to the installation folder you have selected and shortcuts to the Start -menu will be created. An icon will also be created on your Desktop.
- When you have made your selections, click on 'Finish' to end the setup program.
3 Starting TypingMaster 11
3.1 Launching
When you installed TypingMaster 11 to your computer, the installation program added TypingMaster 11 to your Start menu and to your Desktop.
To start the program just either double click on the TypingMaster icon on your Desktop or click on the Start -button and go to Programs. Here you will find the TypingMaster folder which contains the program and manuals. Please click on 'TypingMaster 11' to start the program.
3.2 First time launching
The first time you start TypingMaster 11 you will be taken to the New User screen to create a user.
Since many people can be using TypingMaster on one computer or computer network, TypingMaster 11 has user names to distinguish between users. All your user information will be stored under this user name. When you start TypingMaster 11 with your user name, you can continue practicing from where you left off before.
3.3 Logging in
Once you have created your first user for TypingMaster 11 each time you start the program you will be taken to the login screen.
The login screen consists of a 'User name' field where you will enter your user name. If there are many users from the same computer, you can also select your user name from the drop-down menu by clicking on the arrow at the end of this field. (This option can be disabled by a network administrator for security reasons).
If you are using TypingMaster 11 on a network and the administrator has opted to use password protection, a 'Password' field is also shown.
After entering or selecting your user name you can start the program by selecting 'Enter'.
If you want to make a new user account please select the option 'I am a new user...' This will bring up a screen where you can enter your user name and enter the program.
If you enter a new name to the 'User name' field and select 'Enter', the program will ask whether you are a new user. If you answer 'Yes' the program will start with the user name you typed in.
TIP: TypingMaster 11 supports standard character set in user names.
However, in general it's a good idea to give your user name in 'Firstname Lastname' format (or if you are working with a large user base 'Lastname Firstname' format).
3.4 Exiting
You can exit TypingMaster 11 at any time by clicking on the 'Close' button located in top right corner of the program screen. Also the standard X button in the window frame can be used to exit the program.
When you exit TypingMaster 11 your current settings and studying information is saved, so that when you start the program again, you can continue from where you previously left off. Please note that only completed exercises are saved. If you are in the middle of an exercise when exiting, the specific exercise information is not saved.
4. Using TypingMaster
This section of the manual will go through your first use of the program, explain the user interface and guide you in studying touch typing with the program.
4.1 Getting Started
The general layout of TypingMaster 11 is:
1. The Program Menu for TypingMaster 11 is displayed on the right hand side. This allows you to quickly navigate between the main sections of the program. The Menu also includes links to change the settings of the program and view program version and license information. The program menu is discussed in detail in the Program Menu section.
2. The main portion of the screen is located in the middle where all study and practicing will be done. From here you select one of the links of buttons to take access the study material.
When you login for the first time you will be presented with the Course Selection screen. Here the courses are listed in the recommend order to best learn and improve your touch typing skill. We recommend that you select the option at the top and work your way down. However if you are a more advanced user you may wish to skip some steps. See below for full details of the courses and options available in the Course Selection screen.
Select a course by clicking on the 'Start Course' button next to the course details. This will give you a view of the selected course, listing all the lessons in that course. An option to turn off the Optimized Duration is also show, see more about how the Optimized Duration works here. Click the 'Start Course' button again to continue.
NOTE: To open other courses, simply click on the title links and proceed as described above.
You will then be presented with the main view of TypingMaster 11 Courses section, the Lesson View.
Note that once a course is selected andyou login in the future, the program will remember where you left off and continue from the course and lesson you were up to.
From here you can start to learn with the exercises for that lesson. Simply click on the exercise in the list to begin. We strongly recommend starting from the top and working down through the list as this is how the course was designed to be taken. The program will automatically advance from one exercise to the next and from one lesson to the next. However you are free to any exercise or to move forward or backwards between lessons. To advance lessons click on the >> button to go to the next lesson.
Completed exercises are marked with a check mark and the exercise that you should take next is highlighted.
NOTE: If you are using TypingMaster 11 in a school or business environment there may be some limitations on skipping lessons and exercises set by the network administrator.
4.2 Studying Concepts
4.2.1 Courses
By selecting a course from the list on the Course Selection screen, you will see a short description of the course, the approximate duration for the course, number of lessons in the course and the percentage already studied.
To start a course click on the 'Start Course' button. If you have started a course earlier, the button will say 'Continue Course'.
Here is a list of all the courses you can choose from together with information on each course:
|
Touch Typing Course
|
In this course, you will learn the positions of the letter keys and common punctuation by heart. After completing the course you will be able to type with all ten fingers without looking at the keyboard. |
|
Launch TypingMeter
|
The TypingMeter is not a course but an advanced TypingMaster feature for tracking your real-world typing and customized training. We recommend launching the TypingMeter after completing the Touch Typing Course. Please see the TypingMeter section (chapter 9) for information on the TypingMaster TypingMeter. |
|
Speed Building Course
|
This course is designed to increase your typing speed and confidence. You will focus on the keys for each finger, type longer texts and practice with common words. |
|
Numbers Course
|
This two lesson course teaches how to type numbers on the number row. |
|
Special Marks Course
|
Extend your skills to cover special marks, including Internet characters, mathematical symbols and brackets. Note: Be sure to take the Numbers Course first. |
|
Numeric Keypad Course
|
Learn to use the 10-key pad with touch typing technique. |
NOTE: The courses can be studied in any order you like. The Course Selection page though is designed to work you through the optimal learning order. We highly recommend taking the courses in the order they are listed in the program.
4.2.2 Lessons
Each course consists of lessons which are in turn made up of exercises, 5-8 in each lesson depending on your setup.
When you begin a course, you will be presented with a screen of the first lesson. In the lesson screen, you will see the title of the lesson and all the exercises of the lesson listed. Information on the status of an exercise is displayed next to each exercise. If an exercise is completed, a check mark will be displayed. A blank circle indicates an exercise that has not been completed.
At the top of the screen the course name and the number of the current lesson is displayed. This section also contains a 'Change course' link which will take you to the Courses screen.
To begin the lesson or continue to the next exercise, click on the exercise you wish to take. The highlighted one is the next exercise in order you should take. When the exercise is completed, you will return to the lesson view.
It is also possible to navigate between the exercises. If you wish to study a specific exercise, select this exercise and click on 'Begin'. To navigate between lessons, click on the lesson buttons at the bottom left and right, or click on the lesson number under the course name.
4.2.3 Exercises
The exercises are made up of five exercise types. These basic exercise types are explained in this section.
In addition to these types, in teacher led courses, the lessons can also include games played with the keys being studied. The Review Wizard can also be used as to train the keys that have shown to be difficult for you.
After completing the exercise, TypingMaster will display information on the Duration, Gross Speed, Accuracy and Net Speed of your typing along with written evaluations and a comment.
Your Gross Speed is the actual speed at which you typed. The Net Speed is the Gross Speed minus the errors you made, also called adjusted typing speed.
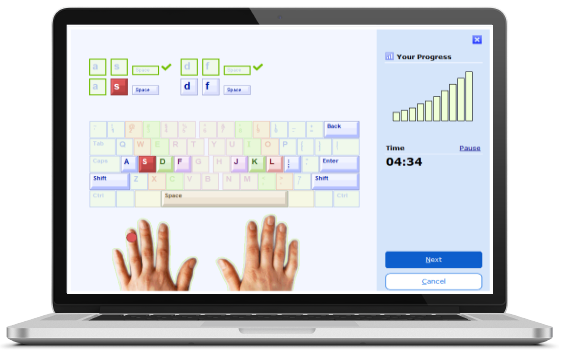
Key drill
The keyboard exercises are designed to teach new keys. The screen in a keyboard exercise is made up of a keyboard with the keys that are currently being studied highlighted.
At the top of the screen, the sequence of keys to be pressed is shown. During the exercise, the key to be pressed is colored green after a 2 second delay.
Underneath the keyboard, two hands are shown. A green dot indicates the finger you should use to press the key in question. This helps you to memorize the locations of the keys and also to use all your fingers effectively when typing.
At the right side of the screen a graph indicates the amount you have completed from the exercise and time left.
Word drill
After learning the new key positions, you will copy words that are made up of the keys already learned. Depending on the language version you are using, the appearance of word exercises may vary somewhat. However, the basic idea is the same.
In word exercises, you copy words that are shown in the top half of the screen.
Your position in the original text is shown by highlighting the current word and removing all copied words.
The right side of the screen contains information on the completion of the exercise.
Sentence drill
Sentence drills are quite similar to word drills. The program shows one sentence per screen. If the sentence is longer, the program automatically wraps it on two lines. You need to press Enter at the end of the sentence for a new sentence to appear.
Paragraph drill
The paragraph exercise is again quite similar to the sentence drill. In the paragraph drill you copy a longer passage of text instead of sentences or separate words.
The main difference in the paragraph exercise compared with the two previous types is that the program no longer forces you to type right before moving forward. You can type on even if you make mistake and therefore need to track your typing yourself.
When you copy a word and press the Space bar, TypingMaster considers the word final and no corrections can be made to it. If you notice and error when typing a word, you can go back and correct it just as long as you don't press Space. Words with errors are marked red.
If you skip over one word in the source text, TypingMaster does not display an error although this is counted as one. This is to help you keep your typing fluent. If you jump over more than one word, TypingMaster displays the word typed as being incorrect and also shows your position in the original text.
Text drill
Text drills are the most challenging and most similar to real typing. The program will show about 15 lines of text at a time that you will copy to the bottom half of the screen. You will no longer have the keyboard visuals to help you but really need to remember the key locations. This drill type is also used as a Lesson Exam in the teacher led courses.
When you copy a word and press the Space bar, TypingMaster considers the word final and no corrections can be made to it. If you notice and error when typing a word, you can go back and correct it just as long as you don't press Space. Words with errors are marked red.
If you skip over one word in the source text, TypingMaster does not display an error although this is counted as one. This is to help you keep your typing fluent. If you jump over more than one word, TypingMaster displays the word typed as being incorrect and also shows your position in the original text.
4.3 Optimized Duration
Optimized Duration is a unique TypingMaster feature that lets you complete exercises quicker if you are making fast progress. Similarly, it will provide extra practice when you need it.
4.3.1 How it works
Optimized Duration works by TypingMaster monitoring your progress in real time when you do the typing drills. If your typing is accurate and fluent enough, the program suggests that you move on and lets you complete the drill in a shorter time span. If it looks like some more training is needed, TypingMaster lets you complete the drill from beginning to end.
With Optimized Learning, your training is based entirely on your personal learning needs. As a result, you are likely to save a lot of unnecessary practice. Your overall skill level will also be better, as weaknesses are addressed immediately with extra training.
To determine your progress TypingMaster monitors two factors during the drills -- accuracy and typing speed:
Monitoring Accuracy
Since good accuracy is the foundation of proficient typing skills, all
drills have an accuracy goal. TypingMaster monitors whether you reach
the goal and gives you feedback after each drill.
Monitoring Typing Speed
TypingMaster constantly monitors your typing speed as well. The better
your speed, the sooner you can move on -- as long as you also reach the
accuracy goal. However, with a typing speed below 15 Words per Minute,
you'll benefit from typing for the full duration of the exercise.
4.3.2 Turn Off Optimized Duration
In case you want to decide how long the drills should be rather than letting TypingMaster guide you, you can always turn off the Optimized Duration.
To turn off Optimized Duration:
- Go to the lesson screen where the exercises are listed
- Click 'Adjust course duration' button at the bottom of the screen
- Click 'Turn off Optimized Duration'
We do, however, recommend Optimized Duration where ever possible as it helps not only to save your time but also provide you with the training level needed.
NOTE: When using TypingMaster 11 in school or company environments the Optimized Duration may not be enabled.
5 Program Features
The Menu at the right side of the program screen is used for navigating in the program. By clicking on an item in the menu, you will be taken to the appropriate section of TypingMaster 11. Below, you will find a list of all the different options in the menu with brief descriptions.
|
Courses
|
This item takes you to the studying portion of TypingMaster 11. If you are already studying a course, TypingMaster will go directly to the lesson you have last studied. If you wish to change a course, just select the 'Change course' option at the top of the screen. The studying section of TypingMaster 11 is discussed in detail in section 4.2. |
|
Review
|
This item takes you to the review section of the program, where you can practice the weaknesses that TypingMaster has noticed during your studying. Detailed information on this section can be found in section 5.1. |
|
Typing Test
|
Clicking on this item takes you to TypingMaster's typing tests. The typing test module is described in detail in section 5.2. |
|
Games
|
From this menu item, you can access the four games that are provided with TypingMaster. Instructions for these games are available in chapter 6. |
|
TypingMeter
|
TypingMaster TypingMeter can be accessed from this menu item. Detailed information on the TypingMaster TypingMeter can be found in chapter 9. |
|
Statistics
|
The statistics section of TypingMaster gives you detailed information on your studying, i.e. exercises completed with typing speed, accuracy and difficult keys information. This section is described in detail in chapter 7. |
|
Settings
|
This menu item will take you to TypingMaster's settings page, where you can set the keyboard layout and other preferences for the program. These options are explained in chapter 8. |
|
Information
|
The Information screen gives general information on the program, including program version and build information and information on user licenses. Links to documentation are also included. If you have a technical problem with the program, please include the version and build information in your email to us. This will help us in determining the cause of the problem. |
5.1 Review
The review section of the program shows you statistics on the keys that are giving you trouble and allows you to fine-tune your skills.
TypingMaster 11 incorporates an intelligent Review system that monitors your typing in the program. Based on the data it collects, the Review creates information on your problem areas.
This information can be viewed in the review section of the program.
The bottom half of the screen shows the keys you are having trouble using a scale OK-Difficult-Problematic. The keys are arranged from the most difficult to the easiest. The difficulty level is based on the amount of mistyped keys and corrections that you have made in the lessons, games and typing test, in text type exercises also delays relative to your typing speed and rhythm.
If some keys enter the difficult or problematic areas and the program suggests that you review your problem areas, it's a good idea to follow this advice.
5.1.1 Review Options
To start a Review exercise, first select the Keys to Review from section 1. The three options are:
| Difficult keys | The program lists keys it finds you are having problems with. |
| Studied keys | The keys you are up to in your course. If no course selected this will be blank. |
| Choose keys |
Here enter any keys you wish to review. Up to 6 keys can be entered. Note: If the program suggests a Review after finishing an exercise, you will be taken directly to the Review exercise with the difficult keys and will not need to make any selections. |
Under section 2 you can select the Method of Review from three options:
| Keyboard drill | You can practice the keys you have chosen as a regular keyboard exercise. This is the same type of exercise as when learning new keys. First sequences of the difficult keys and their surrounding keys are typed out, to get your fingers used to the positions of the keys. Once the key drill is completed, you will type words made up of the letters you are training. |
| Word drill | In this exercise, you type out words made up of the keys that you are practicing. |
| Game | You can practice the keys that you have chosen with the three games in TypingMaster 11. Select the game you want to play and the game will start drilling you on the selected keys. |
Lastly click on the 'Start Review' button to begin.
5.2 Typing Test
TypingMaster 11 includes a typing test that you can use to test your current speed at any time.
5.2.1 Typing Test Options
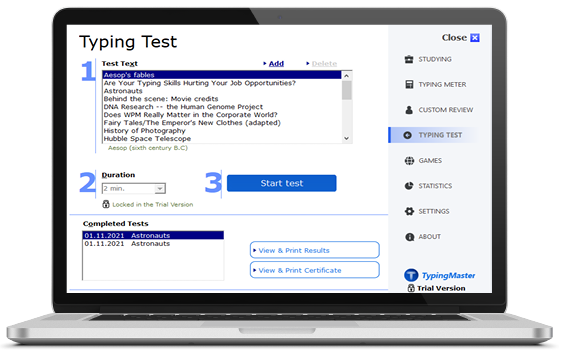
On the Typing Test screen, under section 1, is an extensive range of test texts which have been included. Select any to take a test. Next, in section 2, select the Duration, a typical typing test is at least 5 minutes long. Lastly click on the' Start Test' button to begin.
Once you have completed a test it will appear in the Complete Tests list. This contains all tests and lesson exams you have taken (lesson exams are only used when studying in a school or company environment with teacher led courses). Here select a test and then an option to the right to view results or a certificate. Both these can be printed out (unless printing is disabled by the network administrator).
Adding texts
In addition to the test texts already available, you can add your own text files to be used as test texts. To do this, all you need to do is select 'Add' from the top of the screen and when the file browser pops up select a plain text file to be added.
Please make sure that the file you select is in plain text (these files usually have the ending .txt) Text files created in a word processor and saved as documents usually contain information on the layout of the text and cannot be used.
You can also delete tests from the list. Just select the test you wish to delete and click on the Delete button.
Before starting the test you can also specify a duration for the test or specify the duration to be free. When this option is selected the test will continue until the test text is finished or Cancel is selected.
The bottom half of the screen contains information on the tests you have previously taken. You can also choose to view and print out a diploma of a selected test. When you select the option 'View/print diploma' a new window will appear with a diploma stating the user's name and test results. This diploma can be printed out by clicking on Print.
5.2.2 The Test
In the typing test, you will copy the text you have selected. The program will count your speed and errors. During the test you can make corrections to the word you are currently typing but after the space bar is pressed, the word is considered final and no corrections can be made.
If you jump over a word during the test, TypingMaster will automatically jump to the correct position. Although missing a word is considered to be an error, no error is marked to the text you are writing. This will help keep typing fluent. If you jump over more than one word, the program will mark the typed word as incorrect and display the correct position in the original text by underlining the correct word.
After the test, you will receive results on the outcome of the test. The results will be displayed in WPM (Words Per Minute) or KPM (Keystrokes Per Minute) depending on your selections in Settings. The duration of the test will be displayed along with information on Gross speed, Accuracy and Net speed.
Gross speed is the speed at which you typed during the test. The accuracy percentage counts the amount of words that were correct. With an accuracy of 100% all words were typed correctly. Net speed shows your final speed after errors and can also be called adjusted speed or adjusted words-per-minute.
6. Games
TypingMaster 11 has three games that you can use to practice your typing skills. They are also a good way to warm up before taking a typing test. The games are listed below with brief descriptions.
| Bubbles |
In this game you have to pop the bubbles before they reach the
surface. To pop a bubble, press the character that's inside the
bubble. Each pop gives you points. If you press the wrong key, points
will be taken away. |
| Clouds |
In clouds, you will see a blue sky with clouds rolling by. Some of the clouds will turn sunny and a word will appear under them. On the other hand some clouds will turn dark and stormy. You can catch both types of clouds by typing the word under the cloud. Try not to miss the stormy clouds, since after six missed stormy clouds, the game will end. On the other hand, the sunny clouds will give you lots of bonus points. You can move between the clouds at any time by pressing the Enter key to go forward and the Backspace key to go back. You can also use the space bar to go forward, but it will not work when a word is incomplete. |
| Wordtris | This game is a variation of the classic Tetris. Instead
of trying to fit beams of different types to form rows, you have to
type the words in a beam and catch it by pressing the Space bar before it
hits the bottom. When the box fills up of uncaught beams, the game ends. To get the best possible score, look at the word display at the bottom of the screen when you are typing. |
| Abc |
This simple game is a test in typing speed. The goal is to type
to letters from 'a' to 'z' as fast as possible. Typing each letter
gives you a score the faster you type them the better the score.
When you type a letter the bubble it is in will disappear and you
can then type the next letter. The game ends when all the letters
have been typed. |
Each of the games can be practiced using the keys that you have already studied. The bubbles game can also be studied with small or capital letters or both, or if that's too easy for you, you can always try numbers 0-9 with both small and capital letters.
Clouds and Wordtris can also be played with a vocabulary of animals, cars or proper names.
7. Statistics
TypingMaster 11 gathers detailed information on your typing all throughout your studies. This information is then gathered into helpful statistics which you can view in the Statistics section of the program.
This chapter will describe the different statistics that TypingMaster creates. We will also give you a few tips on how these can benefit you.
The first page under the Typing Speed tab shows the development of your gross and net speed during the selected course. Each bar represents a exercise and with the net speed or gross speed listed in the horizontal axis.
The second page under Accuracy tab shows the development of your accuracy percentage. It is very important that you aim for a hundred percent, since your overall performance will suffer considerably if you make many mistakes, no matter how good your typing speed is. The second page of statistics also shows the keys you are having difficulty in. These keys can be trained in the Review section of the program.
Naturally, it would be preferable if the general direction of the graphs were upward. However, since new keys are being constantly learned, getting used to them will naturally take a while. If the graphs show a considerable slump in one lesson, it might be a good idea to revisit this lesson and make sure that you master the keys taught in that particular lesson.
It is also possible to view and print out a Progress Report on all of the lessons and typing tests taken. Just click on the Progress Report button at the bottom of either Statistics page. A user report sheet containing detailed information on all exercises from all lessons and courses as well as typing tests will be displayed.
NOTE: Statistics are shown independently for each course. To chance courses select the course you wish to view the statistics for from the top drop down menu.
8. Settings
The Settings for TypingMaster can be reached by selecting 'Settings' from the 'Menu'. The settings enable you to select your keyboard layout and modify some aspects of the program.
You can change the following options in the settings screen:
| Sounds | You can select if you wish have sounds in the program (warning sounds when you make mistakes) and whether to play the opening theme or not. Sounds are not required for the use of the program, but add some functionality. |
| Speed Unit | This option allows you to select the method of counting typing speed. If WPM is selected your speed will be counted in Words per Minute. With KPM selected Keystrokes per Minute will be used for counting. |
| Screen Size |
You can select the size of the screen the program will take. 'Maximized window' fills the screen, 'Small window' shows only the center program part, 'Full Screen' is a zoomed view that increases the center program part (recommended for visually impaired users). To change to any of the settings you will need to make you selection close and close and reopen the program. |
| Keyboard Layout | The bottom half of the settings screen is dedicated to selecting your keyboard layout. TypingMaster 11 will try to configure your keyboard automatically based on your Windows settings. However, it is good to make sure that the correct keyboard has been selected and that all keys match.
|
NOTE: Although TypingMaster 11 supports a variety of keyboard layouts, the English version of the program teaches touch typing only on the common western keys.
The language specific special keys are taught only in the corresponding language versions of the program. For different language versions of TypingMaster, please make sure you choose your language during the setup.
9. TypingMeter
This section of the manual will give you a detailed tour of TypingMaster TypingMeter. First, we will give you an introduction to this tool and explain the general concept of it. Next we will explain how to set it up to your own computer and finally we will show how you can make the most out of this program.
9.1 Introduction
A special interactive tool called TypingMaster TypingMeter is incorporated into TypingMaster 11. TypingMaster TypingMeter tracks your everyday typing in any windows program (e.g. when you type a letter in Word or an email in Outlook Express). Based on the information the program gathers about your typing, it will create custom exercises that will train your weaknesses. Since TypingMaster TypingMeter creates exercises to train the keys you are currently having trouble with, the TypingMeter will be able to help you develop and fine-tune your typing very effectively.
How it works:
- Typing Analysis
Selecting TypingMeter from the Program menu takes you through the steps need to launch the TypingMeter. The TypingMeter then starts to monitor your typing in any Windows program.
- Customized Training
Based on the information that the TypingMeter has gathered on your typing, TypingMaster 11 will create material tailored to you needs. The personalized exercises can be found on the TypingMeter menu once you have launched the TypingMeter.
- Quick Results
With these precisely focused exercises, you can get significant results with just a couple of hours of practice.
- Continuing improvement
Since the TypingMeter constantly monitors your typing, TypingMaster 11 can always create fresh material to meet your changing needs.
NOTE: The TypingMaster TypingMeter is language and keyboard independent!
Since the program monitors only your actions on the keyboard (for example the fluency of your typing, the number of errors and corrections you make), you can write in any language of your choice and the program will still detect your problems areas.
9.2 Setting up the TypingMeter
This section will explain how to start monitoring your typing.
First, start TypingMaster 11. After logging in, please select TypingMeter from the Menu, alternatively the TypingMeter is listed as the second course to take in the Choose Course screen, this will take you to the same place. Selecting the TypingMeter for the first time will take you to an introduction screen. Here you are given general information about the TypingMeter and some key settings for the program:
Automatic Launch
The TypingMeter can be configured so that it is started automatically when
you start up Windows. It is recommend that you choose this option as this
is the best way to monitor your typing during normal computer usage.
| Launch TypingMeter automatically | The TypingMeter will launch when you start Windows with the current user account you have in TypingMaster 11. This is the recommended option when you are the only person using the computer, or you have different Windows user accounts for different people using the computer. It is also the recommended option if you want to get the full benefits the TypingMeter can offer. |
| Ask before launching | With this option a pop up window will appear when you start Windows, this will let you select which TypingMaster 11 user account to use with the TypingMeter or turn of the TypingMeter. This is recommended when more than one person is using the Windows account. |
| Do not launch TypingMeter |
The TypingMeter will not be launched when you start Windows and you must open TypingMaster 11 and start the TypingMeter from there. |
Set Notifications
With this option you can set if the TypingMeter will notify you
when there is enough data for a training exercise. Simply leave the 'Notify
me when training is needed' option checked.
New to TypingMaster 11 is the Take a Break feature. This is designed to help keep your computing experience a good one by encouraging you to take regular breaks to strech and move around. This helps with ergonomics trying to prevent repetitive strain from using a computer too much. To enable this simply leave the Take a Break option checked and select how often you would like to be reminded.
Security
Security options give you the possibility to use the TypingMeter
in High Security mode. In this mode the program does not collect any difficult
words, it only records keys that are giving you trouble.
To enable this check the 'Do not collect words' option.
Launch
Once you have made your selections click on the 'Launch'
button to start the TypingMeter. After one more screen you are then taken
to the TypingMeter Training screen When you return to the TypingMeter section
after launch you will be taken directly to the Training screen.
NOTE: Although the TypingMeter has a High Security setting, the program itself does not fulfill high security requirements.
Even though the TypingMeter can be set up in a way that will not compromise security, TypingMaster does not under any circumstances guarantee the security of the TypingMaster TypingMeter.
Therefore the program cannot be recommended in environments where security is of utmost importance (e.g. military or development facilities). .
9.3 TypingMaster TypingMeter
TypingMaster TypingMeter is a small program that monitors your typing while you are using Windows.
When the TypingMeter has been set up, you will notice it as a TypingMaster icon in the task bar at the lower right on your screen. When the TypingMeter is collecting information, the icon lights up. When it is disabled, you will see a cross on top of the key.
To take advantage of the TypingMeter click on the icon to reveal the TypingMeter menu.
9.4 TypingMeter Menu
By clicking on the icon in the task baryou can invoke the TypingMeter menu.
Most of the settings can also be modified from TypingMaster 11 under the TypingMeter heading. However, this menu offers a quicker and easier way to modify and access the TypingMeter settings and learning material.
The first option from the top takes you to the TypingMeter training in TypingMaster 11. Use this when you want to train with your problematic keys and words. The second option will take you to the TypingMeter Statistics in TypingMaster 11, this is a quick way to view your progress with the TypingMeter. Below that takes you to the TypingMeter settings, see below for more information.
The middle option displays the application that is currently being monitored. If you do not want this application to be monitored, just click on this option and the application will not be monitored again.
When you select 'Show Info on Top', a small TypingMeter Info window will appear. This window will display real time information on your typing speed, typed words and the amount of time you have been typing.
Use the 'Enabled' option to stop and start the TypingMeter. When you select the last item in the menu 'Close' a dialogue box will pop up asking you whether you want to close the TypingMeter. This dialogue also contains a check box for launching the TypingMeter automatically at Windows logon. If this box is not selected, the TypingMeter will not automatically start when Windows is started.
9.5 TypingMeter Settings
The TypingMeter settings can be reached from the TypingMeter menu or from TypingMaster 11 by selecting TypingMeter from the menu and clicking on TypingMeter settings.
You can control every aspect of the TypingMeter from the TypingMeter settings. Below the different the different settings tabs are listed along with explanations and tips.
Personal tab
The personal tab displays all personal settings for TypingMeter. The current user is displayed after the heading.
| Take a break |
You can choose whether you want the TypingMeter to remind you to take breaks. Each reminder also includes some useful ergonomics tips with practical things you can do to ease the strain of computer usage. To use the feature check the check box and then with the slider set how often the TypingMeter should remind you. Do note that the TypingMeter detects when you are not using the computer, so the slider indicates time of active use with the keyboard and mouse. |
| Recommend Training | You can choose whether you wish for the TypingMeter to recommend training after a certain amount of information has been gathered. To enable this, check the check box. You can select the interval of recommending from the slider. |
| Security |
The check box can be used for high security as it does not collect your difficult words. When this is selected, TypingMeter will only gather information on difficult keys. This reduces the risk of delicate information, such as passwords, being saved and used in the training exercises. |
Common tab
This tab shows all the settings common to the current Windows user profile. If user profiles are not in use, these settings are in use every time Windows is started.
| Automatic Launch |
When the option 'Launch TypingMeter automatically at Windows logon' is selected the TypingMeter will automatically start when Windows is started and begin monitoring your typing. It is recommended that this option be turned on to ensure that
TypingMeter gathers information every time you use Windows. The more
information TypingMeter gathers on your typing, the better exercises
you will get! |
| User Identification |
This setting controls the way the TypingMeter identifies who is currently using the computer. If you have Windows set up so that either you are the only person using it or each user has their own profile, the first option is recommended. In these cases the TypingMeter knows automatically which person is using the computer. Please select your user name from the drop-down list. Now the TypingMeter will automatically gather information under this name when you log on to Windows. However, if you have many people using the same computer and do not have profiles set up, it is recommended that you select 'Show user list at startup'. When this is selected, the TypingMeter will ask the user to select their user name from the list each time the computer is started. This will eliminate the possibility of the TypingMeter recording information under a wrong user name. If you do not want for the TypingMeter to ask you your user name each time you log on, please select the option 'Start in logged off mode'. This will start the TypingMeter with no user selected and it will not gather information until a user logs in (click on the icon to select the user). |
About tab
This tab shows information about the TypingMeter. The heading includes the program version number. If you are experiencing any problems with the TypingMeter, please contact us and include this version number in you message. This will help us in determining the possible source of your problem.
| TypingMeter Information | This area shows information on the launch method of
TypingMeter and the user that is currently logged in. It is possible
to change the current user by clicking on the 'Change user..'
button. |
| User Statistics | This area shows general usage statistics for the user
logged in. For detailed statistics, please select 'Statistics...'
from the TypingMeter menu. |
9.6 Training
This section of the TypingMeter will help you fine-tune your typing in the problem areas that the TypingMeter has detected. The training section can be reached from the the TypingMeter menu in TypingMaster 11 or directly from the TypingMeter menu.
To start training select a duration for the training session from from the drop-down menu labeled section 1. If you select 'No time limits' the lessons will be gone through without any time limitation. Then click on the 'Start Training' button.
Once you start training you will be presented with a list of exercises and the difficulty index. You can work through the exercises in any order but it is recommend you take them from top to bottom. The difficulty index of the letters and words you have is displayed at the bottom and will be updated after each exercise.
Click the OK button to exit the exercise screen.
You can fine-tune your typing with the TypingMaster TypingMeter continually. Any time you feel the need for some brushing up, just select 'Training...' from the TypingMeter menu and new material will be created to address your current needs.
9.7 Analysis
Under the Analysis tab which you can select from the top of the TypingMeter page in TypingMaster 11, information on your difficult keys, capitals and words is shown. The keys and capitals are ordered according to their difficulty. If you have some problematic keys or capitals, it's a good idea to start the customized practice to get you familiar with these keys.
The list of difficult words is also ordered according to a word's difficulty. This list of words can also be edited by selecting a word or group of words from the list and selecting 'hide' to hide your selection or 'edit' to edit the last selected word. Words can also be added to this list by selecting 'add' and writing the word or words separated by a comma to the box and selecting OK. When a word is added manually, it will get a difficulty percentage of 100.
9.8 Statistics
This section of the TypingMeter can be reached in two ways, either by selecting 'Statistics...' from the TypingMeter menu or by selecting the 'Statistics' tab at the top of the TypingMeter section in TypingMaster 11.
The TypingMeter Statistics give you a detailed analysis of the typing you have done in Windows. The statistics are divided into four sections and give information on your typing speed, how much you typed, how many words you typed and you problem index.
The indices are based on the information that TypingMeter gathers on the fluency of your typing, errors being made and words you are having difficulty mastering. If your overall difficulty index is high, it might be a good idea to start the customized practice in order to iron out the problems you are having.
You can set for what time period you wish to view information from the top drop-down menu, the options are: Last 7 days, Last month and Last year.
10. Entering Licenses
To enter your license / registration key, please follow the instructions you received with the license very carefully. Be precise when inserting your license information, it has to be exactly correct in order for the program to work. This procedure will unlock the trial version and make it a fully functional product with all the lessons and features enabled.
If you have been unsuccessful in entering the license, please try copying and pasting your license information into the fields. Please note that you must enter it exactly as it is shown, do not replace capitals with lower case letters and vice versa.
For details on inserting your license code, please refer to the license email you have received after purchase.
If you have not purchased any licenses, the program will be fully featured for 7 days and after that it goes into a trial mode. The limitations on this trial mode are as follows:
| Full Version | Trial Version |
| Full touch typing course Complete the full touch typing course containing 12 lessons and over 70 exercises |
Only the first two lessons are accessible |
| Many advanced courses Expand your skills with advanced courses covering numbers, special marks, numeric keypad and speed building |
Advanced courses can only be previewed |
| Unlimited Tests Complete full size typing tests |
Duration locked to 2 minutes |
| Unlimited Review Review any keys of your choice |
Limited review options |
| TypingMeter Training Train problematic keys and words with customized exercises |
Training can be only previewed |
HOW TO USE THE TYPINGMASTER 11 STUDY MATERIAL EDITOR
The TypingMaster Study Material Editor (herein
referred to as TM Editor or the Editor) is designed to help teachers, trainers
and translators to modify the existing exercises in TypingMaster 11. The
first chapter guides you through the installation of the TM Editor. In the
second chapter we introduce the different exercise types and tell how to make
changes to the exercises.
1
Installing TM Study Material Editor
The
TypingMaster 11 setup program automatically allows to choose to install the Editor to your device. To open the program choose 'Start Menu > TypingMaster >
Study Material Editor'.
2
Modifying Existing Exercises with TM Editor
Before
you start modifying exercises, we recommend that you get to know the different
exercise types of TypingMaster 11.
2.1
Different Exercise Types
Key
drills
The key
drills are designed to teach new keys. They are combinations of four keys that
will automatically be repeated four times by TypingMaster. Note that the
program does not gather statistics from key drill exercises.
Word
drills
Word
drills consist of rows of words using the letters that have already been
learned. Depending on the language version you are using, the appearance of
word exercises may vary somewhat. However, the basic idea is the same, i.e.
rows of either one or two words, for example:
-
hello hello hello hello hello hello hello; or
- horse
horse horse monkey monkey monkey; or
-
flower plant flower plant flower plant
Sentence
drills
There
are two types of sentence drills in TypingMaster.
1)
Short
sentence is repeated two or three times in a row, for example:
this is jill this is jill this is jill
2)
One
sentence that fills the whole row, for example:
Jill is English and comes from a town called
Kettering.
Type 1
drill is often used in early lessons where repetition is important. Type 2
drills that are used in most lessons are more fun for the user to complete.
Sentence drills can be used without punctuation marks and capital letters if
they have not yet been studied.
Paragraph
drills
Paragraph
drills can only be used after capital letters and full stop have been studied.
The drill consists of several paragraphs that can be of different theme each or
carry the same story line throughout the exercise. Sentences can flow freely
from one row to another just like in any text.
2.2
Making and Saving Changes
Make
sure that TM Editor is installed in the same folder as TypingMaster 11. Start
the program by choosing 'Start-menu > TypingMaster > Lesson Study
Material Editor'.
Once
open, on the left-hand side of the screen you see all the available courses.
The structure of Complete Training is opened by default. You see immediately
how many lessons there are and when different keys are introduced. The
exercises can be edited in the window on the right-hand side of the screen.
You can
now browse through all exercises as well as messages by clicking them open with
your mouse. Once an exercise is open in the edit window, you can make the
changes you want. Note that some exercises are created dynamically and can not
be modified.
TM Editor automatically defines row length, font type
and size for each exercise type, and adjusts the edit window width accordingly.
Note that key drills have only one 4-letter combination per row.
When making changes or creating new material, the
Editor only accepts characters that have been studied so far. The allowed keys
and new keys are shown on top of the edit window on the right-hand side. If you
try to enter a letter that has not been studied, it will not appear on screen
and the computer gives you a warning sound. If an exercise is missing, the
Editor prompts to create one.
Save the exercise either by choosing 'File > Save
changes' or by moving to another exercise and the program automatically asks
you to save changes.
Once you have made all changes that you wanted to, we
recommend that you use the 'Verify tool' of the Editor to quickly check that
exercises do not use keys that are not allowed. Run the check especially if you
have created some exercises using a text editor and copy-pasted them into the
Editor. To run the check, choose 'Tools > Verify exercises for invalid characters'.
Close TM Editor, open TypingMaster 11 and complete
the exercises you have modified to see that they work properly. If you run into
difficulties that you can not solve yourself, please visit our support pages.